 But, this is my friend who asks me to do so. So if it's really unclear, please ask me kindly. It's really my first time.
Application:
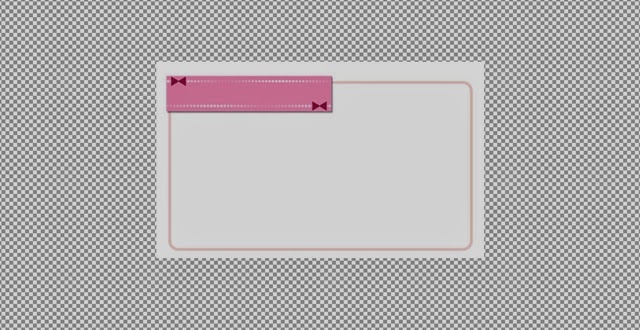
I completed the background fully by using Photoscape. It's the only photo editing application I can master  . The first step is you have to make a transparent layer as the main background for your cbox. Transparent is the best choice because it will fit any colour perfectly. Set it to the size you want. Mine is 500 (width) x 300 (height). You can use GIMP to make the transparent layer but I'm too lazy so, I 'sacrifice' one of my png icons.
. The first step is you have to make a transparent layer as the main background for your cbox. Transparent is the best choice because it will fit any colour perfectly. Set it to the size you want. Mine is 500 (width) x 300 (height). You can use GIMP to make the transparent layer but I'm too lazy so, I 'sacrifice' one of my png icons. 
Steps:
- Open your Photoscape. If you don't own any, you can download it freely.
- Click Editor and then select any png icon or file you have since png files always have a remaining part in it.
- Please take a note that Editor has 4 main tabs: Home, Object, Crop and Tools
- Click the Crop tab and point your cursor to create a rectangular cropping. Just ignore the small size. Then, click 'Crop'.
- Now you have a small size transparent rectangular layer.
- Move into Home tab and click Resize button. Before you type the size you want, don't forget to untick the 'preserve aspect ratio' first.

This is your new transparent layer and don't worry about your png icon. Photoscape has its copy.
- Now move into the Object tab. Draw a box by choosing one of the available box modes. Here you can decide your box has colored background or transparent. Mine is transparent. To make it transparent, click the 'arrow' icon then double click to your new box. There will be a pop up window, tick the 'fill' then you will be able to choose some different border styles. You can also change the colour of your box.
- Now you can decorate your box. Still in the Object tab, insert your png icons by clicking the Photo icon; icon which has two mountains and a sun on it
- You can resize the icon, add text by clicking the T icon and so on.
- Just place the icon as you want


It's like a virtual scrapbooking though.
How to apply:
How to apply:
This how-to-apply is not mine okay:
<center><div id="edited" style="width:500px; height:300px; background:url(url background) no-repeat left top; padding-top: 82 px; padding-left:0px; position:relative" align="center">Cbox Code</center></center>The '82px', you will need to change the numbers. It depends on what size your background has. Based on my background which has 500px in width and 300 px in height, it will be nice if I make my CboX to be:
350 x 105 for the main message form
350 x 90 for the guest's message form
Just put the code at anywhere you want if you use Blogskins, and at HTML/Javascript in Add Widget if you use Template Designer. Hopefully this random post can help you


visit here Boo :3
BalasHapushehe ^__^
owh ya.. I can't find where the cbox XDD
anyway I quite busy.. need to mark my dad student exercise book TT^TT
anyway nice tuto :3
cute :3 hehe
Your daddy is teacher? or lecturer? Btw, my cbox is in the tagboard navigation. one with the 'bubble chat' icon
BalasHapusmy dad a teacher XD
BalasHapusaww.. I see :) hehe
I can't see since my hair being blow by fan.. kind of disturb.. ahaha XD
You like using fan? Aww.. It's so cold. I never stand to be too long under its windy blowing.. Lol
BalasHapusnice tuto... thanks for sharing it :)
BalasHapus